Options
Before and Afters (to help teach and learn)
Okay, here are the rules:
Post your before and afters and then post what you did, in as much detail as possible, what you did to make that picture look like it does. Make sure to mention what program you are using and what version.
I'll start off:

>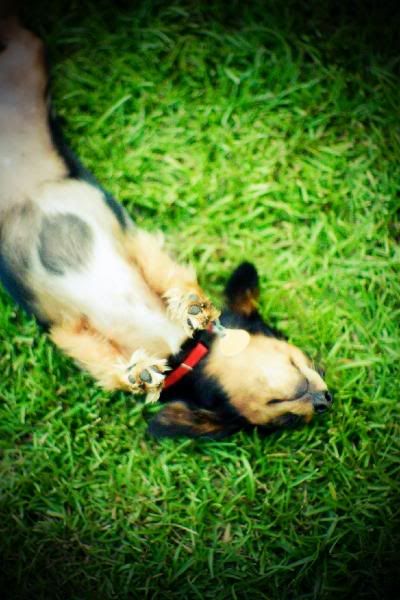
This was done on Photoshop CS3 and to get a bit of a LOMOGRAPHY feeling, I created a heavy vignette by going to filter, lens correction, vignette. Then, change to your CHANNEL MIXER and increase blue and green to about 50%. Then - - VOILA! How easy is that?!
- Ross
Post your before and afters and then post what you did, in as much detail as possible, what you did to make that picture look like it does. Make sure to mention what program you are using and what version.
I'll start off:
>
This was done on Photoshop CS3 and to get a bit of a LOMOGRAPHY feeling, I created a heavy vignette by going to filter, lens correction, vignette. Then, change to your CHANNEL MIXER and increase blue and green to about 50%. Then - - VOILA! How easy is that?!
- Ross
www.rossfrazier.com
www.rossfrazier.com/blog
My Equipment:
Canon EOS 5D w/ battery grip
Backup Canon EOS 30D | Canon 28 f/1.8 | Canon 24 f/1.4L Canon 50mm f/1.4 | Sigma 50mm f/2.8 EX DI Macro | Canon 70-200 F/2.8 L | Canon 580 EX II Flash and Canon 550 EX Flash
Apple MacBook Pro with dual 24" monitors
Domke F-802 bag and a Shootsac by Jessica Claire
Infiniti QX4
0
Comments
Sepia, grain, burned edges, texture!
Sorry so big...didn't downsize this one!
Welcome to dgrin!
Used the Softfocus filter for Photoplugins. Set to max and overlay.
:lurk
Dgrin FAQ | Me | Workshops
That is a great shot! If I hadn't seen the original, I would swear this was a vintage photo. Welcome to the forum! Love the poses in this.
Thanks guys!
And Thanks, Kasey! Welcome to the forum! ; - )Glad to have you here!
www.rossfrazier.com/blog
My Equipment:
Canon EOS 5D w/ battery grip
Backup Canon EOS 30D | Canon 28 f/1.8 | Canon 24 f/1.4L Canon 50mm f/1.4 | Sigma 50mm f/2.8 EX DI Macro | Canon 70-200 F/2.8 L | Canon 580 EX II Flash and Canon 550 EX Flash
Apple MacBook Pro with dual 24" monitors
Domke F-802 bag and a Shootsac by Jessica Claire
Infiniti QX4
Clearly on this one, I was trying for some lens flare and got minimal (you can see some read on her chin, but that's all). So I had to make me some in photoshop. This photo was bland and looked one, maybe two dimensional, as many photographs do, right out of the camera! So I did some work, and this is what I got!
BEFORE
AFTER
On this one, in lightroom, I increased the exposure to 1.53, recovery to 15, then blacks to 17. a little but of curve adjustments to the darks, and highlights set to 65 with a sat of 38 and shadows of 199 set to 12 saturation and toggled with the balance till it's +60. I did almost a full vignette with the midpoint to 31 and a bit of sharpening. I know it sounds like a lot - but just make an action for it and it's nothing! haha. then, I went into photoshop CS3 and cloned out the tip of my finger, created a layer with the SCREEN blending mode. I added a white foreground then made a gradient from where the sun was coming from. Then add a photo filter adjustment layer and set the density to 100%. If your default settings are off, make sure that you have the filter to WARMING FILTER. change the Blending mode to overlay and reduced the opacity just by a couple of percentage points. I got this from an online tutorial, but again, I have an action for it now....so I'm not sure where it came from.
Enjoy!
- Ross
P.S. - I know it seems so elementary for me to have my hand in the picture, but I was having to cover up the sun because it wouldn't focus on her without covering it up....that's what you get when you try accomplish lens flare
www.rossfrazier.com/blog
My Equipment:
Canon EOS 5D w/ battery grip
Backup Canon EOS 30D | Canon 28 f/1.8 | Canon 24 f/1.4L Canon 50mm f/1.4 | Sigma 50mm f/2.8 EX DI Macro | Canon 70-200 F/2.8 L | Canon 580 EX II Flash and Canon 550 EX Flash
Apple MacBook Pro with dual 24" monitors
Domke F-802 bag and a Shootsac by Jessica Claire
Infiniti QX4