This one, only for my fellow Dgrinners.
A couple of days ago, I was posting a thread about how could one get the HDR effect on his photos. Ones like Tim Tadder's for example. Although Tim Tadder himself said that he uses multiple hard lights and sophisticated setup (at least to me since I'm still a noob in lighting) I think I've deciphered a bit on how to achieve this effect. Or maybe not so similar, but it belongs to the same school. And because I love the forum, the first thing I thought about was sharing a tutorial.
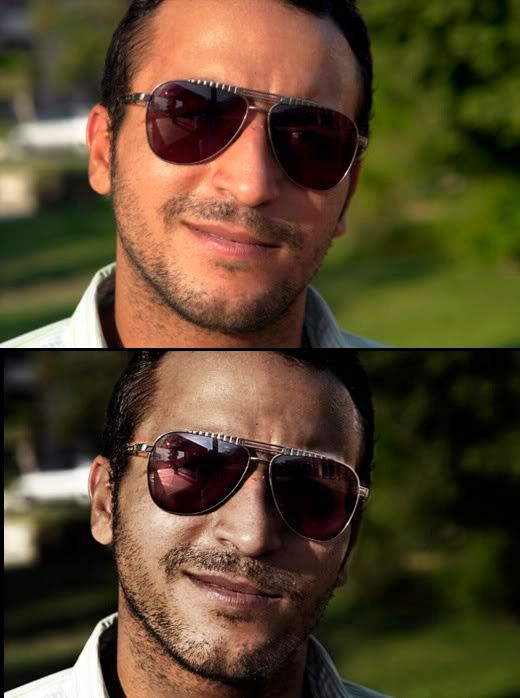
Notice: This is a time consuming tutorial, it can take up to 45 mins/picture if you want to get it done right. I won't be explaining the tutorial using images. Its an advanced one and it will go as most advanced tutorials are, in points.
You would need a wacom if you don't wanna go crazy, many masks here.
1- Levels
Get your image looking good in the first place, apply medium contrast for now, color correct your image if you need to, wether that be by Levels or by Color Balance.
2- Shadows/Highlight - Mask it
Apply Shadows/Highlights to the entire image, don't care so much about the highlights for now, just concentrate on the shadows, brighten them up to your liking, but the effect should be vivid. Then Alt+click on the layer so that the effect is disabled, then use a brush about 30% opacity and ressurect some good details (eyes, reflections, hair... etc)
3- Highpass - Softlight or Overlay
Merge your layers, duplicate, set blending to softlight or overlay. Apply a highpass filter around 6.0 pixels. Don't go too crazy with the slider, we don't want white halos to appear.
4- Unsharp mask - Mask it
Merge your layers again, apply an USM with an amount of 40-50 and a radius of 7.0. Again, don't go too crazy with the sliders, no need for white halos. Only a decent and a bit over crispy photo.
Then, alt+click on the mask to make a black mask, a brush of opacity of 30% and do a selective sharpening over the entire image, just stay clear from the skin. Sharpen the eyes, eyebrows, hair and facial hair if any.
5- Select USM mask, invert, Gaussian blur - Overlay - Desaturate - Eraser brush
Ok now, concentrate, duplicate the USM layer, the one we just did in step 4, choose its mask, press cmd+i, this will invert the mask (showing the places we didn't want to sharpen in the first place). Then apply a Gaussian blur about 2.0-2.5 pixels, set it to overlay, and then desaturate (cmd+shift+U). This will give us underexposed places, choose the Eraser brush (30%) and delete.
6- Curves - Mask it
You can now make a Curves Adjustment layer to apply some overall enhancements to the contrast. Don't forget to mask the underexposed portions.
7- Merge your layers, make 2 duplicates.
We will call the three layers as follows, the most upper (Man) the middle (Woman) the lowest (Bed)
8- Multiply - Desaturate - Mask
• Hold the (Woman), desaturate by (-30).
• Leave the bed alone locked as background.
• Hold the (Man), completely desaturate it, set to multiply. Alter the opacity and mask it till you have no very dark portions. Till you feel satisfied.
9- Layer - Overlay: White Brush, Highlight
Make a new empty layer, set to Overlay and get your white brush and highlight anything you want to highlight (Reflections, glass, eyes.... whatever)
10- Layer - Multiply - Black brush - Shadows
Darken some parts to your liking.
10- Finish up.
Selective exposure - hue/saturation... Give it the color you need.
I sometimes us a Black and White layer to change the luminance as well.. Darken some specific color targeted parts... etc
I hope you find something new after that long read. Feel free to ask for details.
In the dawn, an angel was dancing. Surrounded by an aura of light.
But in the shadows, Vysionous was watching, and with patience awaiting the night.
http://vysionous.deviantart.com
But in the shadows, Vysionous was watching, and with patience awaiting the night.
http://vysionous.deviantart.com
0