First attempts at self portraits - c&c pretty please?
(Ok, this is officially REALLY intimidating. It's one thing to put up "work-in-progress-trying-to-learn" pix, and quite another to put them up of ME!!! lol However, my family have refused to sit for me any more, so the only model I have to practice on is me ::rolls eyes::).
- Lighting: continuing the adventure with nothing more than a couple of clip lamps and 75w daylight bulbs (will be getting the daylight-balanced 100w cfl's recommended next time I see some, but none yet- they're hard to find!) diffused with tracing paper. I *think* I controlled shadows a little better on the unlit side this time compared to the pix of my daughter from last week - not 100% there, but seems improved to me. I used every piece of white card and foamboard I had (including holding one in my lap), and I had one light above me to CR as key, with the other one to my rh side and a bit lower)
- Yes, the bg is wrinkled - I stopped down to 5.6 to try and ensure both eyes in focus (had trouble with that on the first batch which are so NOT for public consumption!), but now the bg is too sharp. Have to figure out a way around that - blurred the heck of it this time out, but not 100% happy with the results. It's actually white, too, but it's in front of a window so I "backlit" it with that and got the vaguely blue glow. It's a, er..., effect. Yeah, that'll be it")
- Framing: IS there some kind of trick for figuring out whether you're in shot or not when you do SPs? Many of the shots were total duds because I cut myself out of the shot one way or another :rollseyes1 :giggle
- Not sure if I did too much on the skin work - my skin's fine (although I'm naturaly very pale), but i have the WORST dark, baggy saggy undereyes ever (it's hereditary, alas - loads of other family with them - and it's been like that since I was about 18. Everybody who's ever had to make me up or photograph me has struggled with them! Sigh.) In any case, I did work on them; I tried to balance the opacity of the layer on which I did the retouching with teh original so it's not *too* plastic (but if it is, tell me - I need to develop my eye).
Gahh... I'm not sure which is hardest - contiuing trying to wrap my head around lighting, trying to frame something interesting from the wrong side of the camera or having to look at myself this much as I process them!!
Anyway, C&C absolutely welcomed on all scores (including posing and ways of flattering my own features better). Btw, while I wasn't consciously going for "headshot" (ie performer) style, I seem to have done it instinctively. No surprise, I suppose, since that's both what i'm used to seeing and what has been taken of me the most and thus I have some experience from the front of the camera. That said, this rather old-fashioned studio style isn't what I would choose if I were having new pix of myself done so at some point I want to move beyond this - way too conservative and static in comparison to the style I really *like*.
I intentionally added a bit of Picasa's "glow"on #1 just for fun - it's a bit 40's Hollywood for me, but since I'm just playing I figured I could go overboard and I kinda like the pose and framing on this one
1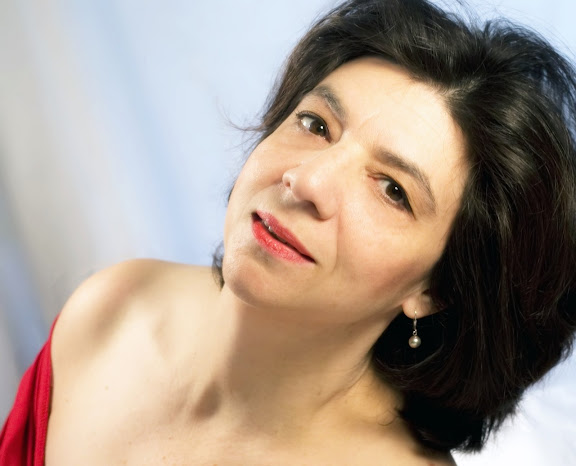
2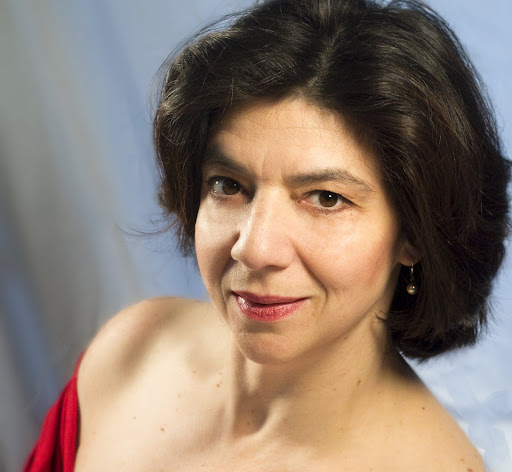
- Lighting: continuing the adventure with nothing more than a couple of clip lamps and 75w daylight bulbs (will be getting the daylight-balanced 100w cfl's recommended next time I see some, but none yet- they're hard to find!) diffused with tracing paper. I *think* I controlled shadows a little better on the unlit side this time compared to the pix of my daughter from last week - not 100% there, but seems improved to me. I used every piece of white card and foamboard I had (including holding one in my lap), and I had one light above me to CR as key, with the other one to my rh side and a bit lower)
- Yes, the bg is wrinkled - I stopped down to 5.6 to try and ensure both eyes in focus (had trouble with that on the first batch which are so NOT for public consumption!), but now the bg is too sharp. Have to figure out a way around that - blurred the heck of it this time out, but not 100% happy with the results. It's actually white, too, but it's in front of a window so I "backlit" it with that and got the vaguely blue glow. It's a, er..., effect. Yeah, that'll be it
- Framing: IS there some kind of trick for figuring out whether you're in shot or not when you do SPs? Many of the shots were total duds because I cut myself out of the shot one way or another :rollseyes1 :giggle
- Not sure if I did too much on the skin work - my skin's fine (although I'm naturaly very pale), but i have the WORST dark, baggy saggy undereyes ever (it's hereditary, alas - loads of other family with them - and it's been like that since I was about 18. Everybody who's ever had to make me up or photograph me has struggled with them! Sigh.) In any case, I did work on them; I tried to balance the opacity of the layer on which I did the retouching with teh original so it's not *too* plastic (but if it is, tell me - I need to develop my eye).
Gahh... I'm not sure which is hardest - contiuing trying to wrap my head around lighting, trying to frame something interesting from the wrong side of the camera or having to look at myself this much as I process them!!
Anyway, C&C absolutely welcomed on all scores (including posing and ways of flattering my own features better). Btw, while I wasn't consciously going for "headshot" (ie performer) style, I seem to have done it instinctively. No surprise, I suppose, since that's both what i'm used to seeing and what has been taken of me the most and thus I have some experience from the front of the camera. That said, this rather old-fashioned studio style isn't what I would choose if I were having new pix of myself done so at some point I want to move beyond this - way too conservative and static in comparison to the style I really *like*.
I intentionally added a bit of Picasa's "glow"on #1 just for fun - it's a bit 40's Hollywood for me, but since I'm just playing I figured I could go overboard and I kinda like the pose and framing on this one
1
2
facebook | photo site |
0
Comments
I know you have a flash unit.....does the head tilt and swivel on yours?
Jeff
-Need help with Dgrin?; Wedding Photography Resources
-My Website - Blog - Tips for Senior Portraiture
Yes, the 420ex is a full tilt/swivel flash. I've been toying with setting it up so it bounces into a reflector behind or to the side of the camera and then onto me (or whoever my hapless victim for the day is
For all the reasons you mentioned....."am I in the frame?", "am I in focus", then if all that is right, "what does my expression say"?
A tough gig as a photographer....and as a subject for sure...
To touch on a few things...
- When I am trying to learn something new I usually leave it very simple for myself. Leaving as much as possible constant with only the one new trick as a variable...as I said...as much as that is possible.
So for you...and...your project.....lets try to simplify things.
1-Does it have to be in full color?
Working in monotones will open up other avenues for you as far as mixing light sources without having to worry about the white balance issues we face when mixing light sources in color images.
For example, you could use your current set-up and then use the flash (bounced or not) at minimal power for fill...or just to boost the exposure.
Or you could use windowlight and then use your clamp lights for fill.
Things like this would be a pain in the neck for a color photo. Trying to gel all the different light sources to match would be iffy at best. Monotone images, though, would make it a possibility.
2- I question your choice of clothing.
Your choice to be sure but...
Higher neck-lines are (more often than not) more flattering. Just as importantly (and actually more pertinant to these photos) a higher neckline, or vee would have removed the distraction of the exposed skin of your chest and shoulders. Even tank tops can be tough to deal with on head and shoulder shots such as these. Remember, the area of interest is the face...and within the face the eyes. In these, the skin near your shoulder is as bright as any other part of the images...definately a distraction from the face. Not impossible to control, but if we are going to simplify things....maybe a different top is in order?...even if it were a BW image.
In either case, I much prefer your second photo. You seem a little tense in both, but more so in the first, and I find the lighting in #1 to be a bit on the flat side. #2 isn't that bad actually, but its the little things...if you really want to improve it......loosen up...you look tense(
..and...lastly....
Jeff
-Need help with Dgrin?; Wedding Photography Resources
-My Website - Blog - Tips for Senior Portraiture
Yeah, it was pretty funny! I woke up this morning dead tired after a gig yesterday and for whatever reason decided I just HAD to have another try at this while my hair was still poofy from last night :crazy :giggle Totally nuts, but I guess plenty of people on this board get it and understand the tendency to get, uh, absorbed in shoots ... lol The worst was when I'd get all in position and push the remote and realise I'd forgotten to put the camera in "standby" so I had to get up and do it all over again....
Translation from Southern Politeness: wb sucks
HA!! Here's the truth: I just grabbed that dress and threw it on to see how red would work (I've never had any photos done while I was in bright red, even though I wear it a lot), and didn't think it would work at all!
you should've seen that hot spot before I moved the light
BUSTED! I was doing Miss Diva Thang - while I wasn't aiming for "total slut", as a theatrical type it's usually thought appropriate to at least hint at a bit of skin (those 18th century dresses mean we're kind of used to it
Usually wouldn't actually go with red, but black. In fact, here's one from the other day (when I first started this odyssey). Not sure if I like it or not - it took a TON of processing to get it even this acceptable (I think at one point it was using 15 layers or so - seriously processed!), which told me I needed to work harder on a more effficient capture so that I had better material to work with
(the vertical "half and half" shawdowing and the neck shadow really bug me - that was one of my goals for this next batch, to lose the neck shading somewhat and soften the face ones so they modelled instead of dissected!)
Yeah, I was trying to remember all the things people have used on me for posing when I've had pix taken, and I just couldn't remember - I know the left side of my face is ALWAYS more successful and that I need to lean in more with my shoulders, but after that, I was clueless. I suspect the apparently tension may be from holding the reflector and the remote while trying to pose!!!
Heeeheee... thanks! And of course thanks for the AWESOME helpful commentary. I suspect I'll keep coming back to this project in coming weeks (at least I'm a cooperative model when I'm in the mood to shoot!) so will be thinking about ALL of these comments!
Off a tad maybe, but not enough to bother me.....I was really trying to lead you to think of alternate light sources.....honest...thats all.
Nuetral works best....usually. I am not much for studio shots, but have seen some nice examples where the clothing color was in line with that of the background as well. Nicely framing the face.
That "hotspot" should be on your noggin. Perhaps they are a little low...and aimed too far down?
I checked my comments......and Im certain I said neither of these things.
No problemo!
...and if you are lucky...in the meantime someone who actually works with studio type set-ups will chime in to give you some REAL advice!
Jeff
-Need help with Dgrin?; Wedding Photography Resources
-My Website - Blog - Tips for Senior Portraiture
In any case, BIG thanks. I too prefer "real" light to studio setups (always have) but it's cold outside (boy is it cold - brrrr!) and I figure if I can learn to manipulate light in a controlled situation I may get better at doing the same thing elsewhere too. I'm so totally hooked on the whole thing it's not even funny - I'm literally DREAMING of things I want to try and everywhere I go I'm noticing light, how it falls, what colour it is etc etc. Totally different world... and very cool!
Well at least I'm not alone in that regard. I've been "caught" more than once...outdoors...in a conversation with someone...staring into the distance...then over my shoulder to see where the sun is....then at my watch......
"What are you looking at?"
The light.....ceaslessly!
Jeff
-Need help with Dgrin?; Wedding Photography Resources
-My Website - Blog - Tips for Senior Portraiture
Lighting
Framing - You have to visualize where you head is going to be and how large it is. Then zoom the lens as appropriate and add a little fudge factor. Maybe you're using your 50mm f/1.8? If so, then you're going to need an assistant for a minute - have them stand there while you frame a shot. Measure the distance - there's your camera-subject distance you need for that lens.
Wrinkled background - open up your lens a bit more and/or more you further away from the background.
Jeff's idea that you work in B&W until you get lighting settled will help you by limiting your focus (no pun intended). You will be able to concentrate on just the one thing - getting your lights where you want/need them for the effect you are going for.
Your photo in post #5
My Photos
Thoughts on photographing a wedding, How to post a picture, AF Microadjustments?, Light Scoop
Equipment List - Check my profile
It's just all very new to me - I have NEVER really understood light, even though it has fascinated me in the theatre, as well; the penny just never quite dropped. I think also that I'm not as logical/mathematical/methodical as you are and thus winding up in sort of a scattershot intuitive approach through being self-taught and that probably unecessarily mudddies the waters (I'm scouring around for some classes - even if only in basic lighting - because I feel sure that if I *saw* this in action with "real" equipment I'd understand it pretty easily; trying to do it trial and error exclusively from reading about it is for sure turning it into a more complex thing than it needs to be, you're right!).
Some of these things I corrected this morning (the red dress) vs the previous shoot, so I'm starting to think about this in the right way (I think)
Yeah, I think I move around a lot, too - I like portraits with a sense of energy and movement in them and I think I'm straying too far as I experiment with different positions and poses. Sometimes it works, sometimes not, but seems from what Jeff said that's partly just the nature of the SP, too!
I need to see if I can carve out a space in the basement, too - the room I'm working in is too small, really (about 9x10) - with the 50 1.8 I don't have quite enough room to pull back to create some air space in the frame (easily fixed by cropping) and am simply too close for there to be much of a margin of error.
Yeah, I think I will go for bw next time - is it better to shoot colour and convert, or just go for a grayscale capture?
As always, my sincerest thanks - it is tremendously helpful to have the feedback *and* the how-to's. Appreciated!!
PS Thanks for the image diagram too - makes it much clearer!
First question - since you are trying to get a handle on light/shadow and aren't really worrying about rendering a great work of art, I think setting your camera to shoot gray scale JPG will simplify your process and feedback loop quite a bit. Generally speaking, camera gray scale is not a good way to go, but I think it's the best option for you right now.
Feedback and how-to's are how we all learn. I just hope my contribution has help you.
As for the diagram - visual people learn best by seeing it. Words are great, cut "a picture is worth a 1,000 words!" Try that set up once and see if it doesn't get you a lot closer to your intended goal.
My Photos
Thoughts on photographing a wedding, How to post a picture, AF Microadjustments?, Light Scoop
Equipment List - Check my profile
I don't have the experience of Jeff or Scott to comment on the lighting but I appreciate you starting this thread so we can all learn. I'm looking forward to your next set as you work on some of the suggestions given.
Comments and constructive criticism always welcome.
www.mikejulianaphotography.com
Facebook
I don't know much about lighting either, so I'm sure that the advice the others have given you will help you more than the guess work that I could give you.
I took your second shot, ran it through ACR. The only adjustment was clarity up 30, then opened in CS3.
Then I ran your shot through ACR again, but this time, clarity down 40, then layered that on top of the other shot.
Layer mask the softer shot, removed the eyes mouth and earring.
Added a gradient mask B&W layer.
Merged the layers.
Added/fixed the highlights in your eyes.
Ran highlights/shadows and lightened the dark areas a bit.
Then a little diffused glow, and you have a 40's style headshot.
original
B&W
Basking in the shadows of yesterday's triumphs'.
Yep - I've been googling like a crazy fool and seen loads of sites, but some of it is (even to my novice eyes) clearly not that good, or alternatively assumes specific equipment and/or prior experience to parse the information, so it confuses rather than clarifies.
~~bats eyelashes~~ Pretty please?
Heee! I don't mind at all - it's great to see other people's "take" on it all (espsecially with the specifics laid out clearly like that), so THANKS!
My main approach to the retouching was actually using the patching tool (worked a treat on the undereyes) and then very low opacity cloning, both on a separate layer, and then further adjusting the opacity on that layer (sometimes duplicating that layer as well so I had even more ways to fine tune. I tried for a fairly light hand on these; my goal in the was to get rid of the uglies, but leave some natural texture - in other words, I intentionally left lines and other flaws to keep it on this side of natural, if only to see if I *could* figure out how to do that (learning process and all that).
Actually, I was footling around with LR tonight and came up with my own 40's-ish version - I have to confess, these just make me laugh as even as little as 10 years ago this is what opera singer headshots REALLY looked like (old fashioned or what?!) and it's only in the last couple of years as things have moved to pretty much all-digital and colour that classical musicians have caught up with the rest of the world ie adopted a more casual and/or urban chic/pj style.
Anyway, below is my own 40s messing about - not quite as retouched as yours, but with a cheezy white vignette and a emphasised reds and magentas to bump up the lipstick colour and lighten the bg. Silly, but fun!
Btw, Mikej, I HOPED it might be beneficial to somebody else either now or via the search function in the future and am very glad to hear that it is indeed of iinterest to others and I'm not just cluttering up the forum with my own witterings.
- The Strobist Lighting 101 - This is almost a "Must Read" and I would recommend you dig through this before you did much of any other reading. These might be a good place to start:
- Bouncing off of Walls and Ceilings
- Balancing Flash and Ambient - Part 1
- Balancing Flash with Ambient - Part 2
- Cross Lighting
- Headshot in a Corner - I have used this (twice) to actually make money!
- Studio Lighting - a beginner's guide to lighting. Lots of good information here and I think it's not too high a level. Everything shown here can be done with the equipment you already have with, maybe, just a little modification. Part 3 & part 4 show the various "classic" lighting setups.
- Part 1
- Part 2
- Part 3
- Part 4
- LIGHT - a detailed tutorial - Read all 4 parts. The stuff you are going to want soonest is in part 4, but the other 3 parts build a foundation upon which to better understand the content of part 4.
And, I just have to comment on the B&W edits - I like your a bit better than the one done up by davv. Mybe it's because I'm entering my "old f@rt" years?My Photos
Thoughts on photographing a wedding, How to post a picture, AF Microadjustments?, Light Scoop
Equipment List - Check my profile
I'm sure I'll be pursuing this over the holiday so thanks for the added ammunition
(and thanks for the kind words re the bw - it was just a bit of messing around w/grayscale following your and Jeff's suggestion and I decided to have some fun with it!)
http://www.prophotolife.com/video-library/
#13 and #14 are very basic lighting setups.
Basking in the shadows of yesterday's triumphs'.
The 1st shot looks a touch over exposed and soft to me. Also the lighting is bit flat..and you look very nervous heh.
The 2nd shot, the lighting has improved and you look almost comfortable! It still looks a touch soft and not very contrasty. Not enough POP!
One day I will try a SP..looks fun
14-24 24-70 70-200mm (vr2)
85 and 50 1.4
45 PC and sb910 x2
http://www.danielkimphotography.com