Skin tone help needed
I've had a sudden rush of headshot requests (1 this week, 1 next
week). These need a lot more attention to skin tones than I usually do,
and I don't have a calibrated monitor.
Set-up : tripod, fairly good daylight plus one flash and lightsphere,
shot on Olympus Raw (WB set to 5500). For each sequence (same camera
settings) I took one shot with a 90% white card (ezy-balance disk
actually).
First try : I used Camera Raw automatic, plus auto adjust (mainly
brightness). But the customer complained it's too red.
Second try: I loaded the shot with the white card, and used the white
balance tool. ( 4860, tint +1), followed by auto adjustments : Exposure
+0.9, Blacks +4, Brightness +37)
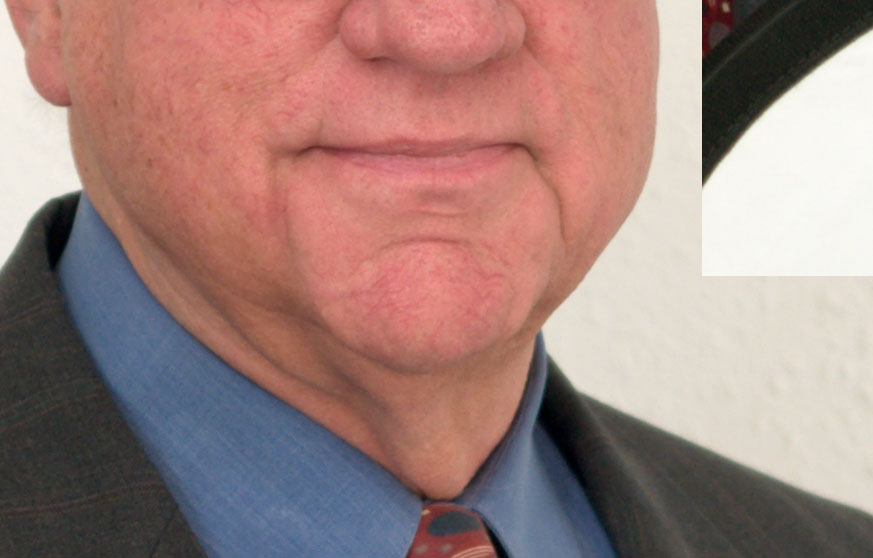
The following are crops, with the white balance card copied next to
some skin.
The original still looks very red.
<http://www.farfoto.com/090204_BB_TEST/P2041342N2_RGB_ORIG.jpg>
I went to the 'skin tone' page
http://www.smugmug.com/help/skin-tone
which says yellow must be more than magenta, and cyan must be a bit less
than magenta.
Method 1 : in sRGB mode
Levels adjustment : Set blue gamma to 0.9
Hue adjustment : set red saturation to -7
<http://www.farfoto.com/090204_BB_TES/P2041342N2_RGB_LVL_HUE.jpg>

or about 3MB of photoshop
<http://www.farfoto.com/090204_BB_TES/P2041342N1_RGB_LVL_HUE.psd>
That still looks a bit too red.
Method 2 : CMYK method
Convert to CMYK mode.
Set the eyedropper to a 31x31 sample.
Curve adjustment :
Set to yellow channel.
Point eyedropper (center of chin) and press Ctrl-Shift
to add the point on the curve.
RE-READING the instructions it looks like I should do the following:
Increase the point's yellow channel above the magenta
[ In the example you multiply the yellow by 1.66 ]
Decrease the magenta so "yellow is 5-20% above magenta"
[ In the example multiply the adjusted yellow by 0.8 ]
Set cyan to 33% of Magenta
Multiply the adjusted magenta by 0.33
The before/after CMYK values I used are actually
C: 21/17 M: 65/45 Y: 48/50 K: 3/3
Result :
Converted back to RGB before writing the jpg:
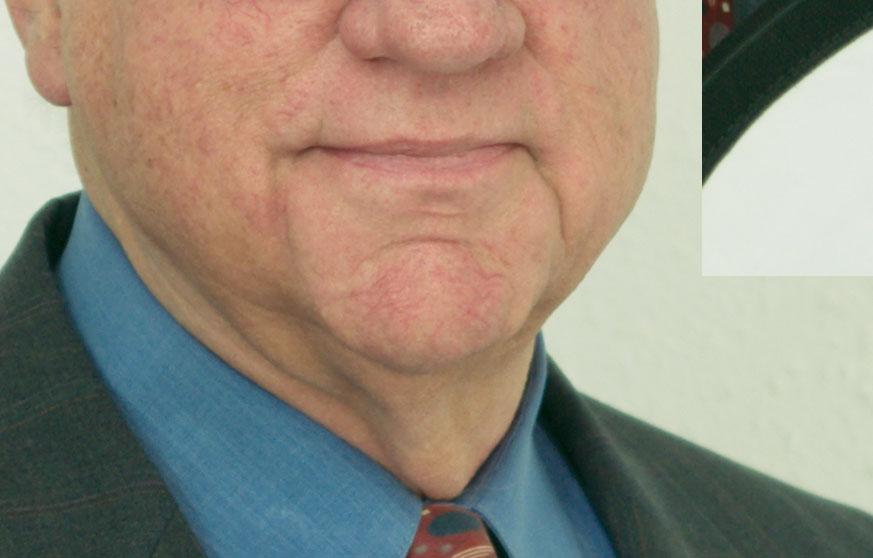
<http://www.farfoto.com/090204_BB_TEST/P2041342N2_CMYK_2_RGB.jpg>

or photoshop CMYK 3MB
<http://www.farfoto.com/090204_BB_TEST/P2041342N1_CMYK.psd>
That looks a bit TOO yellow .
I'd be grateful if someone with a calibrated monitor could look at
those --- and (if you deem neither acceptable) even more grateful if
you could tweak my values or point me to a better method.
(ps : The final shots are correctly focused -- I can apply the correction just to skin, or to the whole photo).
week). These need a lot more attention to skin tones than I usually do,
and I don't have a calibrated monitor.
Set-up : tripod, fairly good daylight plus one flash and lightsphere,
shot on Olympus Raw (WB set to 5500). For each sequence (same camera
settings) I took one shot with a 90% white card (ezy-balance disk
actually).
First try : I used Camera Raw automatic, plus auto adjust (mainly
brightness). But the customer complained it's too red.
Second try: I loaded the shot with the white card, and used the white
balance tool. ( 4860, tint +1), followed by auto adjustments : Exposure
+0.9, Blacks +4, Brightness +37)
The following are crops, with the white balance card copied next to
some skin.
The original still looks very red.
<http://www.farfoto.com/090204_BB_TEST/P2041342N2_RGB_ORIG.jpg>

I went to the 'skin tone' page
http://www.smugmug.com/help/skin-tone
which says yellow must be more than magenta, and cyan must be a bit less
than magenta.
Method 1 : in sRGB mode
Levels adjustment : Set blue gamma to 0.9
Hue adjustment : set red saturation to -7
<http://www.farfoto.com/090204_BB_TES/P2041342N2_RGB_LVL_HUE.jpg>

or about 3MB of photoshop
<http://www.farfoto.com/090204_BB_TES/P2041342N1_RGB_LVL_HUE.psd>
That still looks a bit too red.
Method 2 : CMYK method
Convert to CMYK mode.
Set the eyedropper to a 31x31 sample.
Curve adjustment :
Set to yellow channel.
Point eyedropper (center of chin) and press Ctrl-Shift
to add the point on the curve.
RE-READING the instructions it looks like I should do the following:
Increase the point's yellow channel above the magenta
[ In the example you multiply the yellow by 1.66 ]
Decrease the magenta so "yellow is 5-20% above magenta"
[ In the example multiply the adjusted yellow by 0.8 ]
Set cyan to 33% of Magenta
Multiply the adjusted magenta by 0.33
The before/after CMYK values I used are actually
C: 21/17 M: 65/45 Y: 48/50 K: 3/3
Result :
Converted back to RGB before writing the jpg:
<http://www.farfoto.com/090204_BB_TEST/P2041342N2_CMYK_2_RGB.jpg>

or photoshop CMYK 3MB
<http://www.farfoto.com/090204_BB_TEST/P2041342N1_CMYK.psd>
That looks a bit TOO yellow .
I'd be grateful if someone with a calibrated monitor could look at
those --- and (if you deem neither acceptable) even more grateful if
you could tweak my values or point me to a better method.
(ps : The final shots are correctly focused -- I can apply the correction just to skin, or to the whole photo).
Alan :thumb
af-photos.smugmug.com
af-photos.smugmug.com
0
Comments
Portfolio • Workshops • Facebook • Twitter
My 'method 2' (Third picture) ? Thanks!
I guess I need a monitor calibrator, then!!
ps -- I've been googling for an hour, and sat through three droning tutorials, and haven't found an eassier way of doing it than the smug-mug methods!
My only problem with the tutorial is that it's described as 'percentages of percentages'. When it says (for instance) that yellow should be "20% more" than magenta does that mean that I ADD 20% to magneta, or that I MULTIPLY the magenta by 1.20 ?
af-photos.smugmug.com
Quick PS Elements skin tone adjustment.
With just a touch of saturation
http://www.knippixels.com
Andy clarified in a PM that he liked the third picture (second method).
[ Fantastic smug support, as usual! ]
The short answer is that I need to calibrate my monitor !
And the results are very different on my desktop/Viewsonic lcd [fluorescent backlight] and on my laptop [led backlight]. I'd previously seen this on a web site where I had a beautiful 'aged paper' background -- which came out sickly green on my laptop.
In addition to the overall color I also need to tone down some of the veins. The 'blur' tool gives acceptable results, but I'll look at some other techniques.
af-photos.smugmug.com