Tutorial: How to repair a chopped subject

lynnmalynnma Registered Users, Retired Mod Posts: 5,208 Major grins
edited September 27, 2005 in Finishing School
37723221-L.jpg

Working with the original drag onto a new canvas and start cloning in the background.

37723223-L.jpg

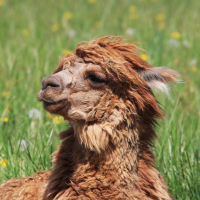
Using the liquifying tool "push" the nose out a little.. I also used the "bloat" tool, just one little tap to give it a little oomph and roundness.

37723224-L.jpg

I use the "patch" tool to blend the edges of the cloning, I also cloned the white background around the nose, used the "sponge" tool to soak up some of the white and then "burned" it just a tad as it was very white.

37723226-L.jpg

I used the "blur" tool to soften the edge of the green making it look more natural and less noticable and cropped it.

37723228-L.jpg

End result.

37723217-L.jpg

Rutt, the originals are here ... hope it's ok..:D

Comments

  • ginger_55ginger_55 Registered Users Posts: 8,416 Major grins
    edited September 27, 2005
    That is great info, Lynn. Now I can save many more photos, lol. Of course, for those one really wants, like family, dogs, etc. This is great info. I have had this problem.


    ginger
    After all is said and done, it is the sweet tea.
  • ruttrutt Registered Users Posts: 6,511 Major grins
    edited September 27, 2005
    Wow, thanks Lynn. Vickie is camera shy and always in motion and it's really hard to get a good shot of her. Saving this one mattered to me. Thanks.
    If not now, when?
  • AndyAndy Registered Users Posts: 50,016 Major grins
    edited September 27, 2005
    wd, lynnie. i changed the title to make it searchy-friendly
  • pathfinderpathfinder Super Moderators Posts: 14,703 moderator
    edited September 27, 2005
    If I had not seen the original, Lynn, I'd have never guessed!!
    Pathfinder - www.pathfinder.smugmug.com

    Moderator of the Technique Forum and Finishing School on Dgrin
Sign In or Register to comment.