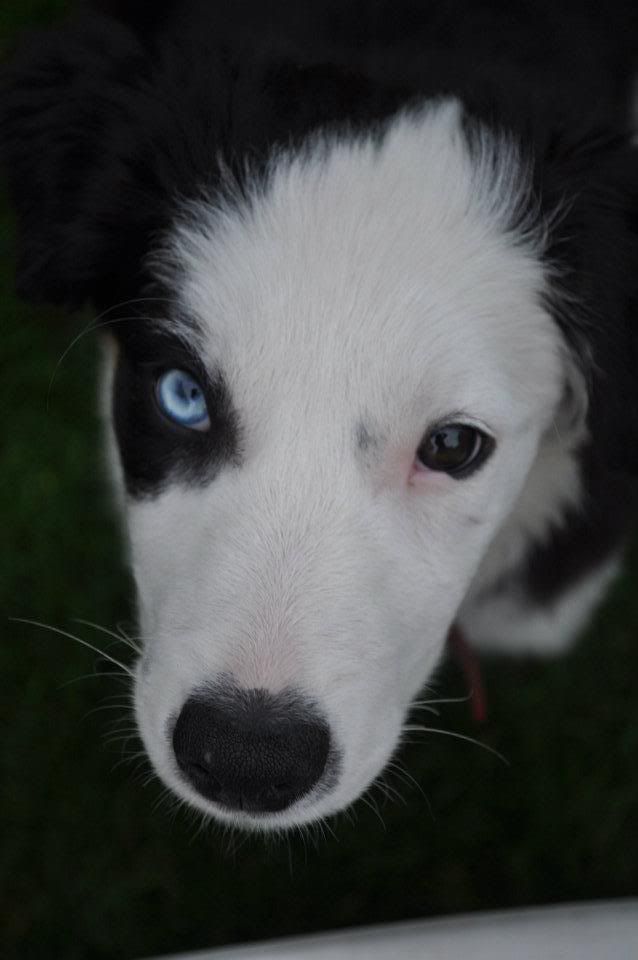
Help please
Hi
How do I make this pic have a total black background?

How do I make this pic have a total black background?

Until one has loved an animal, a part of one's soul remains unawakened - Anatole France
Megan Amelia Photography
Megan Amelia Photography
0
Comments
If you have Photoshop ( or many other image editors ) you could just use a soft black brush and paint black into the corner, or as a vignette around the dog.
Lightroom will even do a vignette for you with the Post Crop Vignetting tool found in the Effects panel of the Develop module.
If you prefer the head selected and the rest of the image black, then you are going to have to use a Selection Tool of some sort, to select the dogs head, to paint around.. I wrote about swapping backgrounds here - http://www.dgrin.com/showthread.php?t=116223
More specific answers will depend on what software you are using.
Moderator of the Technique Forum and Finishing School on Dgrin
also recommend setting white point, sharpening, and using the shadows/highlights filter to open the shadow details on the nose a little more.
RadiantPics
WOW that's incredible!
Thanks so much for the help - think I'll have to book onto a photoshop course. I have PhotoPlus X2 software
Megan Amelia Photography
Moderator of the Technique Forum and Finishing School on Dgrin
I, for one, have no idea what this means. I can find the blend-if sliders, but can't for the life of me figure how to use them "to restore the whiskers."
Natural selection is responsible for every living thing that exists.
D3s, D500, D5300, and way more glass than the wife knows about.
Google is your friend.
RadiantPics
OK, thanks, but nothing I've read tells me how to use it with a mask to restore whiskers, as in this shot.
Natural selection is responsible for every living thing that exists.
D3s, D500, D5300, and way more glass than the wife knows about.
Blend-if is just one way to darken the background while preserving the whiskers. Another
way is to build a mask that isolates the whiskers from the background. Put that mask on
a blank layer and paint with black. But masking is sort of an art unto itself that takes a
good deal of practice. In this case you could use the calculations panel to create a mask,
then refine it with the mask-edge feature (CS5). Here's my result using that approach:
Yet another way to do this is simply paint with black (on a blank layer, of course) to
cover the background, whiskers and all. Then, on another blank layer, sketch in some
whiskers. They're just little hairs, so they don't have to precisely match the original.
For that, use a small brush and set it to fade. The number of pixels you set in the fade
window will determine how long the hairs are, so you'd want to vary that to get
different lengths. Here's how that comes out ...
RadiantPics
John, the beauty of the Blend IF sliders is that no mask whatsoever is needed.
You have the dog head on the bottom layer, and the black ink sprayed around the edge of the upper layer, being careful not to paint over the black areas of the dog.
Now click on the button in the upper right of the Palette menu to open the Blend If command menu.
At the bottom are a set of sliders for the Grey channel - since the dogs whiskers are almost pure white move the sliders on the upper layer to allow the white whiskers to show through the black vignette painted on the upper layer, and Photoshop will do the selections for you without a mask.
If you read page two in this link it will explain what I am talking about. -- http://www.photoshopessentials.com/photo-effects/blend-if/
Blend If sliders were discussed a while back when we reviewed the The Canyon Conundrum/ Photoshop Lab Color book by D Margulis, but I can't sem to dig it up right now.
Here's another link using the Blend If sliders for correcting purple fringing
http://www.dgrin.com/showpost.php?p=189066&postcount=7
Moderator of the Technique Forum and Finishing School on Dgrin
Now to figure out WTF this means: "In this case you could use the calculations panel to create a mask," and this: "For that, use a small brush and set it to fade. The number of pixels you set in the fade window will determine how long the hairs are."
Never heard of the "calculations panel" and damned if I can find any way to set a brush to fade, much less find a "fade window". I've dug through all my CS5 books and wasted an unconscionable amount of time in tutorials from numerous PS geniuses, and guess I'm just learning disabled.
Natural selection is responsible for every living thing that exists.
D3s, D500, D5300, and way more glass than the wife knows about.
Moderator of the Technique Forum and Finishing School on Dgrin
Calculations.
Brush fade.
RadiantPics
Sorry to bother you.
Natural selection is responsible for every living thing that exists.
D3s, D500, D5300, and way more glass than the wife knows about.
You don't bother me, you puzzle me. Google turned up answers to your questions
in, literally, five seconds. I was puzzled as to why you wouldn't think to just punch
"photoshop calculations" into Google and pull up a ton of answers. I realize this is
challenging, technical stuff, but finding tutorials is so easy to do.
RadiantPics
You can find it here - http://www.deke.com/content/photoshop-top-40-feature-33-calculations
Moderator of the Technique Forum and Finishing School on Dgrin