New processing technique, well for me at least....
 gmonkeh
Registered Users Posts: 312 Major grins
gmonkeh
Registered Users Posts: 312 Major grins
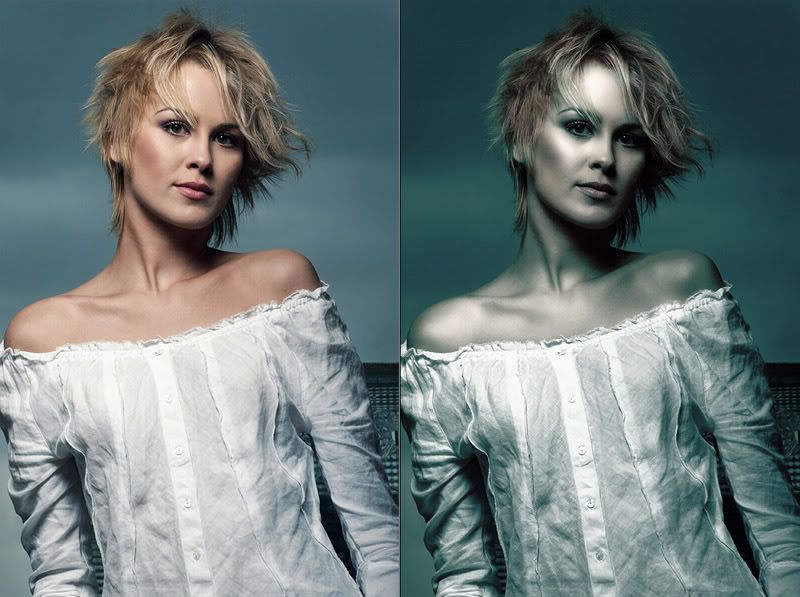
The above example was quite easy to do actually. I was just browsing around the retouchpro site and saw someone ask how the after effect was done. So I took a stab at it and was surprised to how easy it was.
First you need a decent image to work on. Good lighting with lots of contrast.
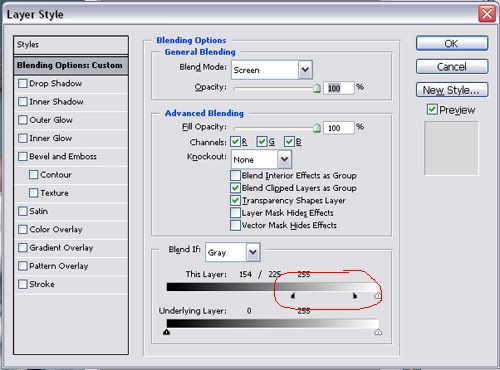
First you have to enhance the highlights with a diffuse effect. Duplicate the image, apply a Gaussian Blur of about 10-20px and set the blend mode to Screen, then access the advanced blending options.
In the "This layer" blend if slider, take the blackpoint slider to the right until you see the highlights in the image selected then hold the ALT key down then slide the other half of the black point slider further right until you get a good blend/diffuse effect. See illustration below.
Flatten then duplicate the new layer, select the duplicate layer then go to Image > Adjustments > Desaturate - then set the opacity to around 60% just enough to get the color back but with a subdued tone.
With the new layer still selected go to Image > Adjustments > Brightness/Contrast and give it a Contrast of +15
Use CTRL + ALT + ~ (tilde) to select the highlights then under the select menu choose Inverse (Shift + CTRL + I)
with the selection still active, go to the layer Adjustment menu (black and white half circles in layer pallete) and choose Solid Color and pick a color you want used in the effect. (I used #16534C)
Change the adjustment layer's blend mode to Darken. Change the Opacity to taste. Select the Solid Color's Layer Mask and with a soft black brush set around 25% gradually mask out the hair to reveal original color.
And basically that's it. It might look complicated now but do it a couple of times and it will be a breeze.
http://www.reverbphotography.com
Nikon D300
Nikkor 85mm f/1.8D
Tamron 28-75 f/2.8
Nikkor 80-200 AF-D ED f/2.8
2 Alien Bees AB800
Nikon Speedlight SB800
Elinchrome Skyport Triggers
Nikon D300
Nikkor 85mm f/1.8D
Tamron 28-75 f/2.8
Nikkor 80-200 AF-D ED f/2.8
2 Alien Bees AB800
Nikon Speedlight SB800
Elinchrome Skyport Triggers
0
Comments
I'm honestly confused: what effect were you going for?
"Dead Bride Under Morgue's Light"?
I mean, there are tons of way to abuse an otherwise good original picture, what is so special is about this one?
Zero pun intended, honestly...
The reason I did the tutorial was because someone at another board asked how to do this effect. http://www.klucivespolek.cz/web/werwolf's%20night/werwolf's%20night.php
So I obliged and tried to recreate said processing.
Sorry if it wasnt to your approval.
Nikon D300
Nikkor 85mm f/1.8D
Tamron 28-75 f/2.8
Nikkor 80-200 AF-D ED f/2.8
2 Alien Bees AB800
Nikon Speedlight SB800
Elinchrome Skyport Triggers
I only asked what were your intentions, since the effect seems rather... strange...to me, that is .
I did not mean to insult or upset you in any way. If I did, I sincerely apologize.
I think it was the part where you suggested that he had "abused" the image and that this was only one of many ways to ruin a good picture!
But getting back to the picture I think its interesting, it does make it different and I specially like what it has done to the fabric.
I do wonder what other effects could be gained by using different colours maybe something less "morgue" like
My www. place is www.belperphoto.co.uk
My smugmug galleries at http://stuarthill.smugmug.com
Thanks for sharing.
Malte
5D2/1D MkII N/40D and a couple bits of glass.
I saw this image referenced on Retouch Pros. On that site, my impression was that it was the original that was up for questioning, how that effect was achieved, as opposed to a more usual reddish tone that a normal shot would show.
There have been many threads on other sites (not here very much, probably because the photographers here are more confident of their own results and less inclined to duplicate what's been done by others) about this type of image, with desaturated reds and blue/green casts in the shadows. It always comes down to the same three things: Lights, camera (and the eye behind it) and maybe an Action or two. But the first two are the most important.
As for the image you linked to, note the difference in the area around her collar bone with yours; your values are pushing blue far too low in the range, and you've lost the red touch that the linked image has retained. That's the key to this effect, reds that are desaturated below normal, but not to neutral, and certainly not to blue or green. Also, usually, the bottom end of the range is compressed upward. The lightest areas are her shirt and maybe the hotspot on her right cheek, and they read (in greyscale numbers) 10-14%. The compression needs to be distributed throughout the range, retaining the light/dark ramp. It still looks like there's a highlight on her cheek, even though it's too dark by conventional standards.
Everywhere the magenta/cyan balance is tipped in favor of cyan with yellow on top, but there's a fine line between desaturated reds, and full-out greens. You need to make sure that your highlights, quartertones and midtones hug that line without pushing into pure green. Three-quarter tones can go greenish, but push your shadows to neutral.
—Korzybski